
Some commands such as the Trajectory motion command, requires data to be loaded to the PMC configuration before they can be run. The details of trajectory configuration are provided below.
-
The trajectory is defined by a tab delimited text file (xxx.txt), with 6 or 7 columns. Column definitions are fixed, you must upload either 6 columns or 7 columns, without any header rows
-
When uploading a file with 6 columns, they are defined as X(mm), Y(mm), Z(mm), RX(mrads), RY(mrads), RZ(mrads)
|
Column 1 |
Column 2 |
Column 3 |
Column 4 |
Column 5 |
Column 6 |
|---|---|---|---|---|---|
|
X-axis (mm) |
Y-axis (mm) |
Z-axis (mm) |
Rx-axis (mrad) |
Ry-axis (mrad) |
Rz-axis (mrad) |
-
Trajectory points are relative positions to the starting position of the XBot when the command starts executing. E.g. a first trajectory point of (0, 0, 0, 0, 0, 0) means maintain current XBot position
-
For 7 columns, they are defined as X(mm), Y(mm), Z(mm), RX(mrads), RY(mrads), RZ(mrads), Motion Axis (PMC Digital Output)
|
Column 1 |
Column 2 |
Column 3 |
Column 4 |
Column 5 |
Column 6 |
Column 7 |
|---|---|---|---|---|---|---|
|
X-axis (mm) |
Y-axis (mm) |
Z-axis (mm) |
Rx-axis (mrad) |
Ry-axis (mrad) |
Rz-axis (mrad) |
Motion (DO) |
-
Entering a value of 1 into Column 7 means turn on the digital output pin of the PMC. A value of 0 means turn off the digital output of the PMC
-
The XBot will directly follow the trajectory provided by the file, therefore it is important to keep the speed and acceleration within the specified limits when generating the trajectory
-
The temporal interval of trajectory can be from 1 [ms] to 10000 [ms]
-
# of trajectories is limited to 64, this can be upgraded to a higher number. Please contact PMI if you require more trajectories
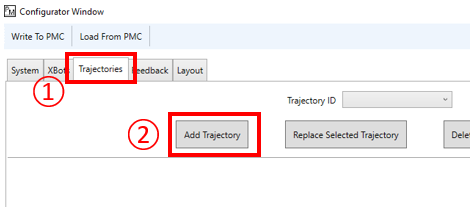
After creating a valid trajectory file, open the configurator.
① Choose the Trajectories tab
② Choose Add Trajectory, and select the desired trajectory file
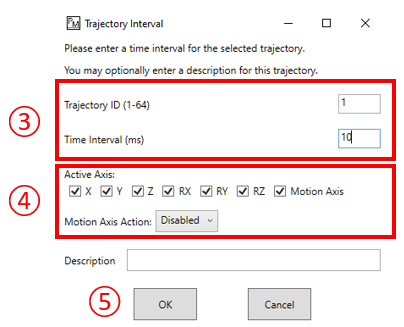
③ In the pop up window, enter the desired trajectory ID and time interval between trajectory points
④ Choose which axis of the trajectory file to use, and which ones to ignore / discard. The motion axis can have a customized action (Disabled or Control PMC Digital Output)
⑤ Optionally enter a description for this trajectory, then click OK

⑥ Review the added trajectory
⑦ If it is satisfactory, choose "Yes" to confirm trajectory addition
⑧ Write configuration to the PMC