Library Download
For details about the releases, see here.
|
PMLib Version |
Compatible with PMC Version |
Download |
Changelog |
|---|---|---|---|
|
6.03.048.00 |
117.22.47 or higher |
||
|
6.03.047.00 |
117.22.04 or higher |
||
|
6.03.046.00 |
117.20.49 or higher |
||
|
6.03.044.01 |
117.20.40 or higher |
||
|
6.03.039.00 |
117.17.43 or higher |
||
|
6.03.037.00 |
117.17.12 or higher |
Library Setup
Creating a new project
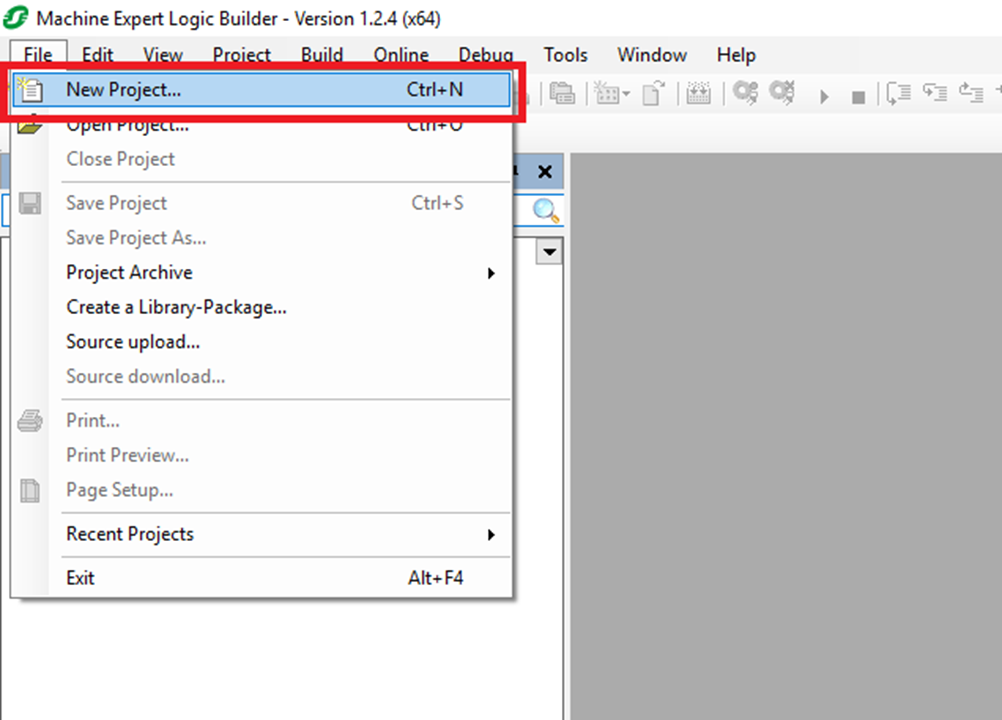
Step 1: Start by clicking File->New Project
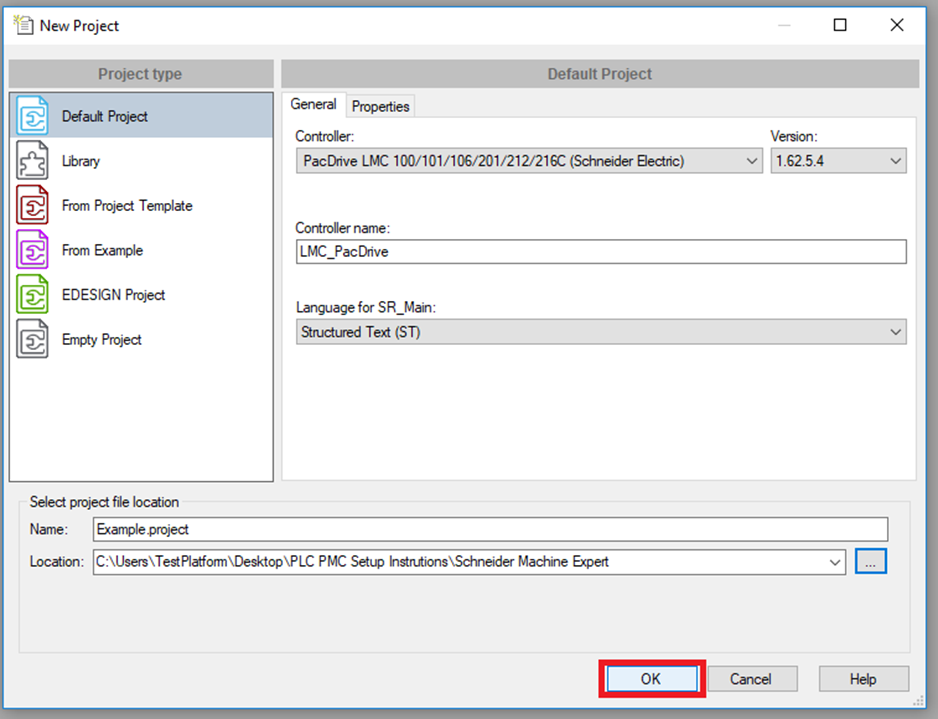
Step 2: In the New Project window select Default Project for the Project type. Then select the Controller to be used and select the Language for SR_Main. The library works for Structured Text and Ladder Logic, but this example uses Structured Text. Lastly choose and name and location for the project and then click "OK"
Setup Fieldbus
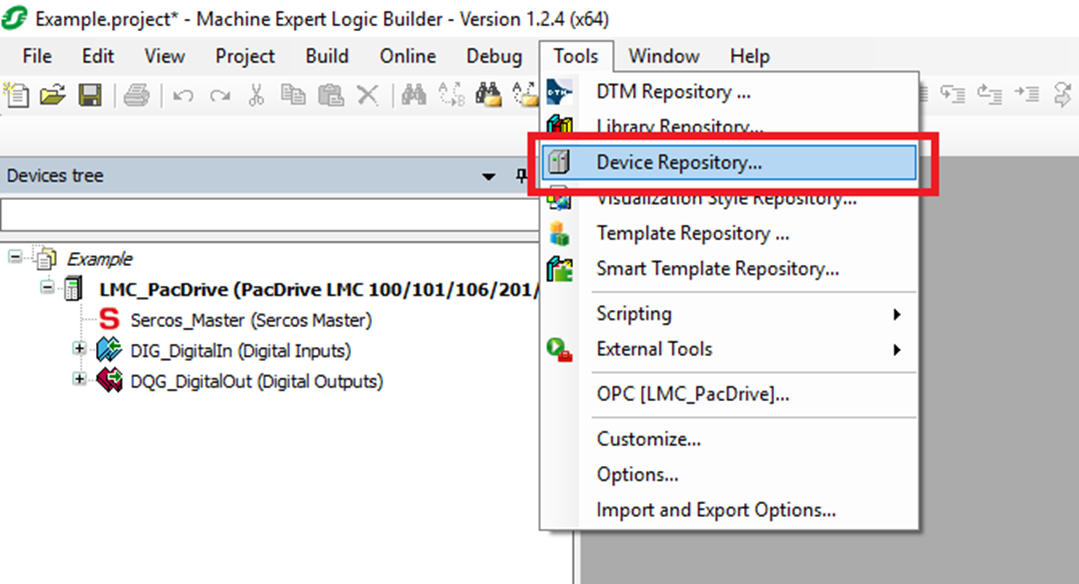
Step 1: Click Tools->Device Repository
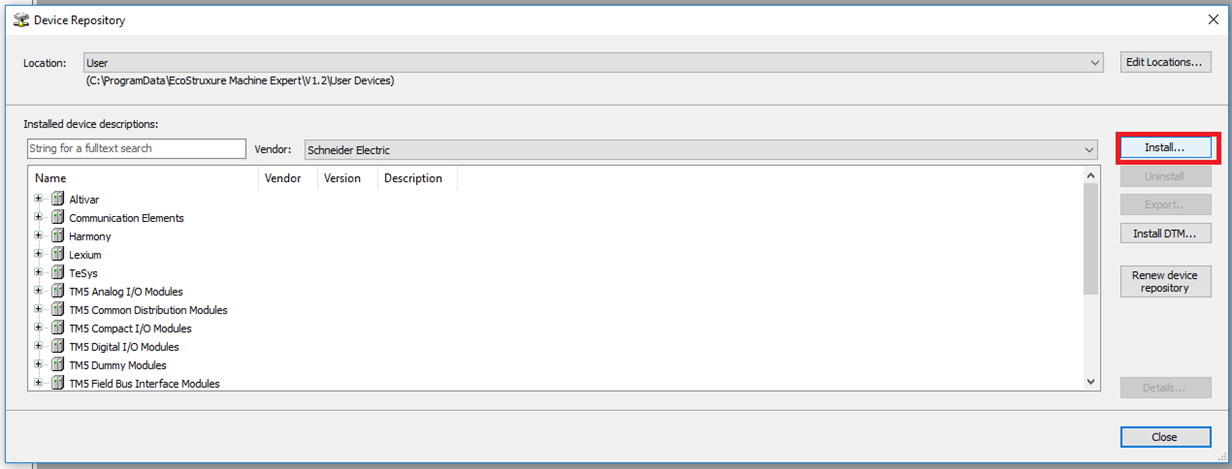
Step 2: In the Device Repository window click "Install..."
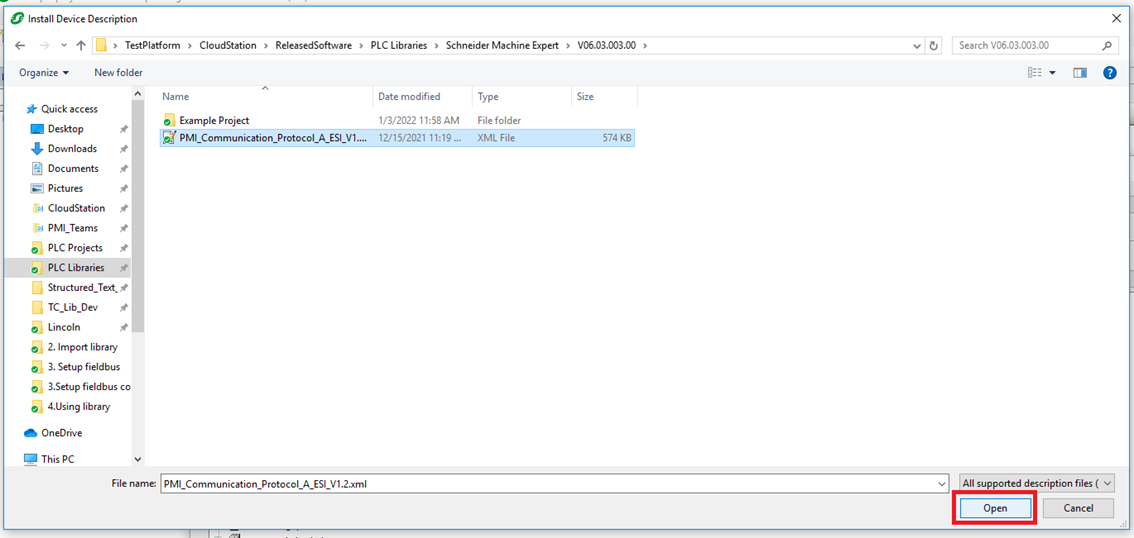
Step 3: In the Install Device Description window browse to the description file (this example uses the EtherCAT bus) and then click "Open"
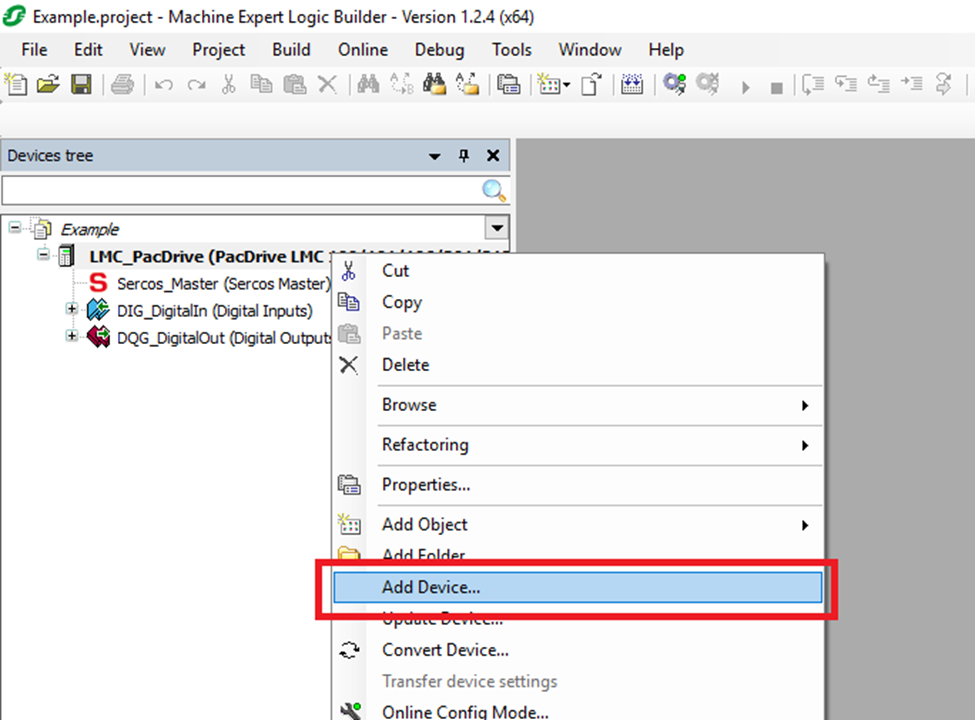
Step 4: In the Devices tree right click on the Controller and click "Add Device..."
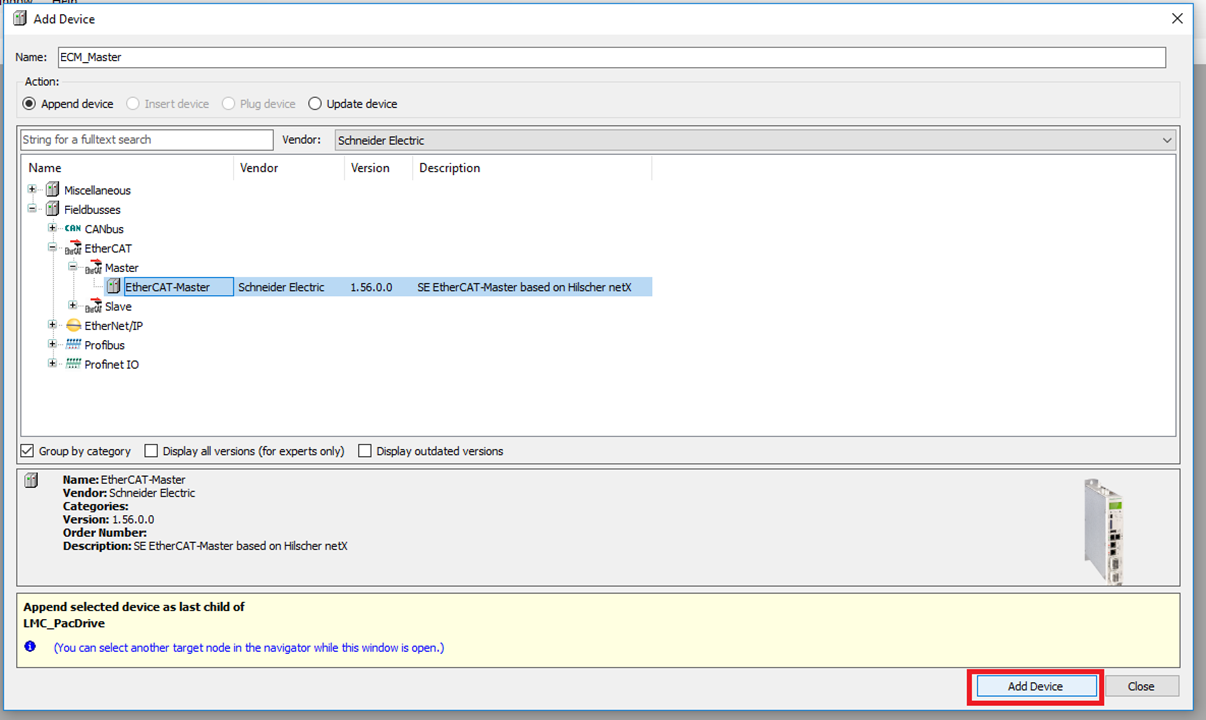
Step 5: In the Add Device window select the Schneider Electric EtherCAT-Master and click "Add Device"
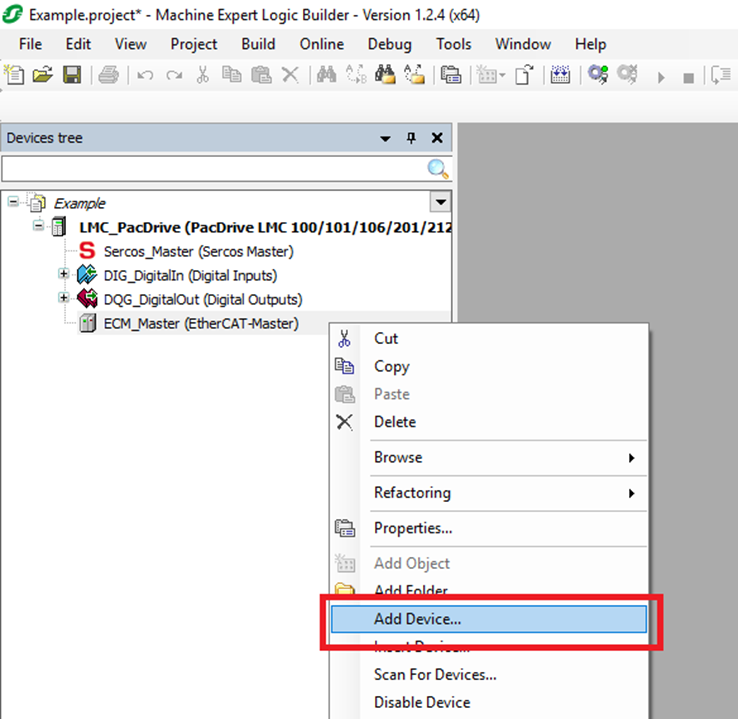
Step 6: Right click on the new EtherCAT-Master and click "Add Device"
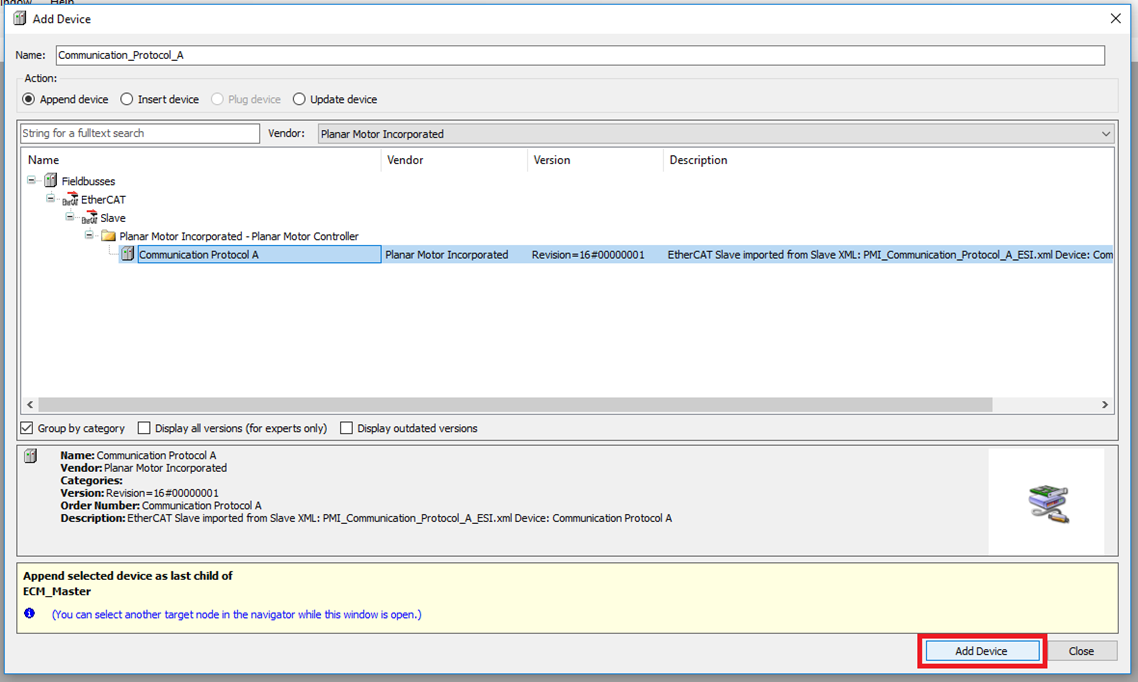
Step 7: In the Add Device window find and select the Planar Motor Controller device and click "Add Device"
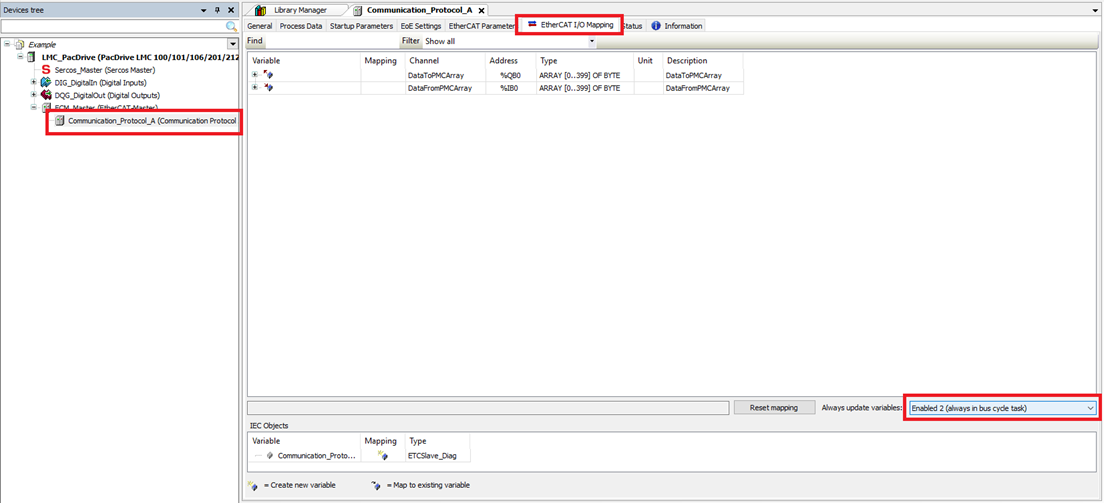
Step 8: Click the new Planar Motor Controller in the Devices tree and enter the EtherCAT I/O Mapping tab. Change the Always update variables: setting to Enabled 2 (always in bus cycle task)
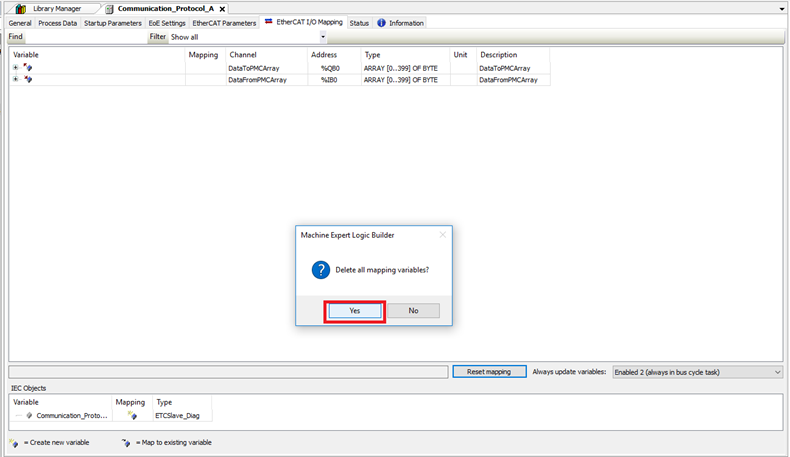
Step 9: Before mapping the two arrays, click Reset mapping to delete the auto created mapped variables.
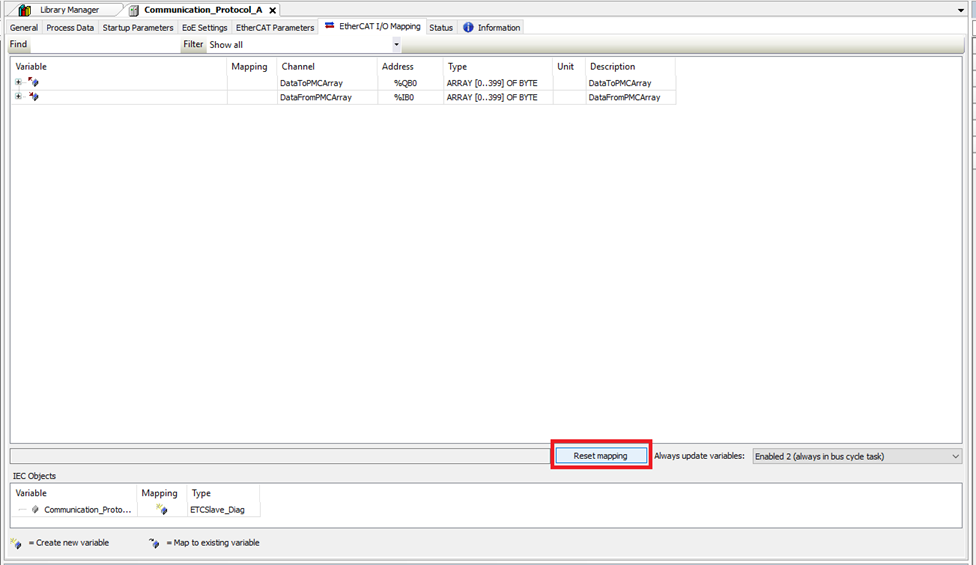
Step 10: Click Yes in the confirmation window
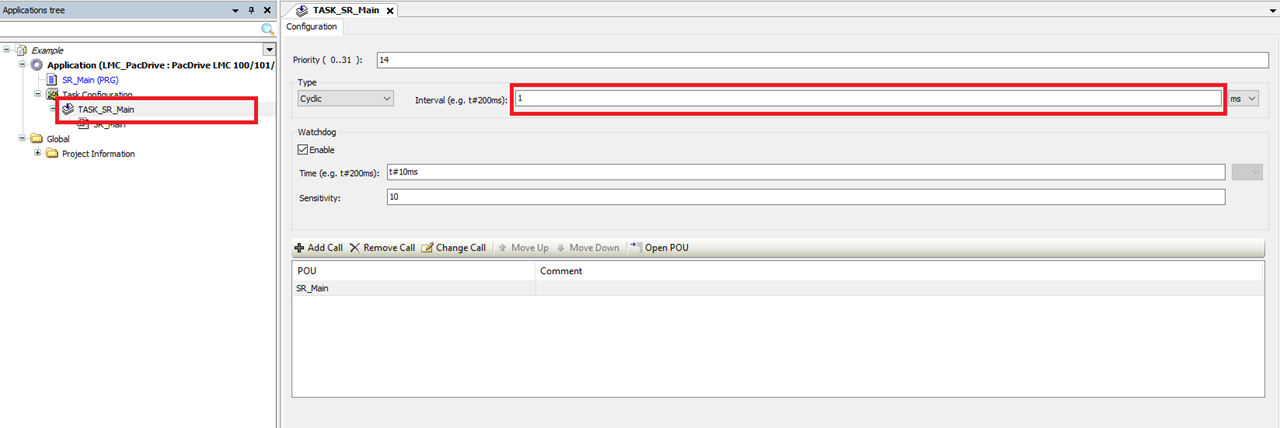
Step 11: Lastly make sure that the Cycle Time of the EtherCAT-Master matches the Cycle Interval of the Task

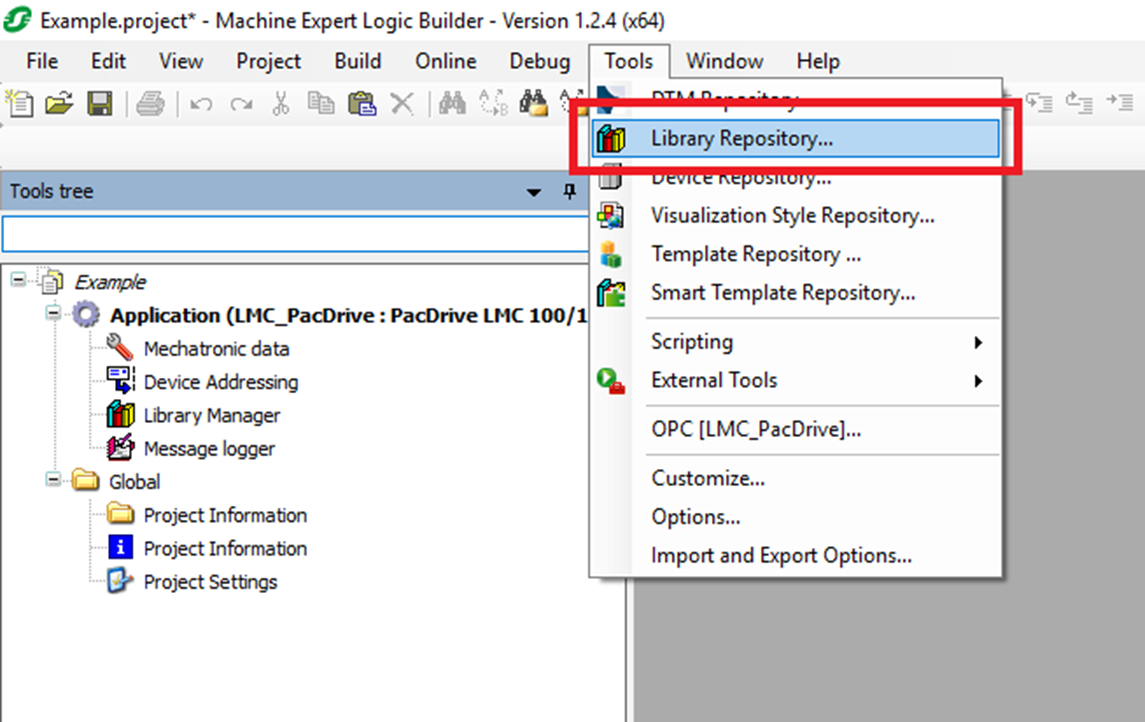
Import and use library
Step 1: Click Tools->Library Repository
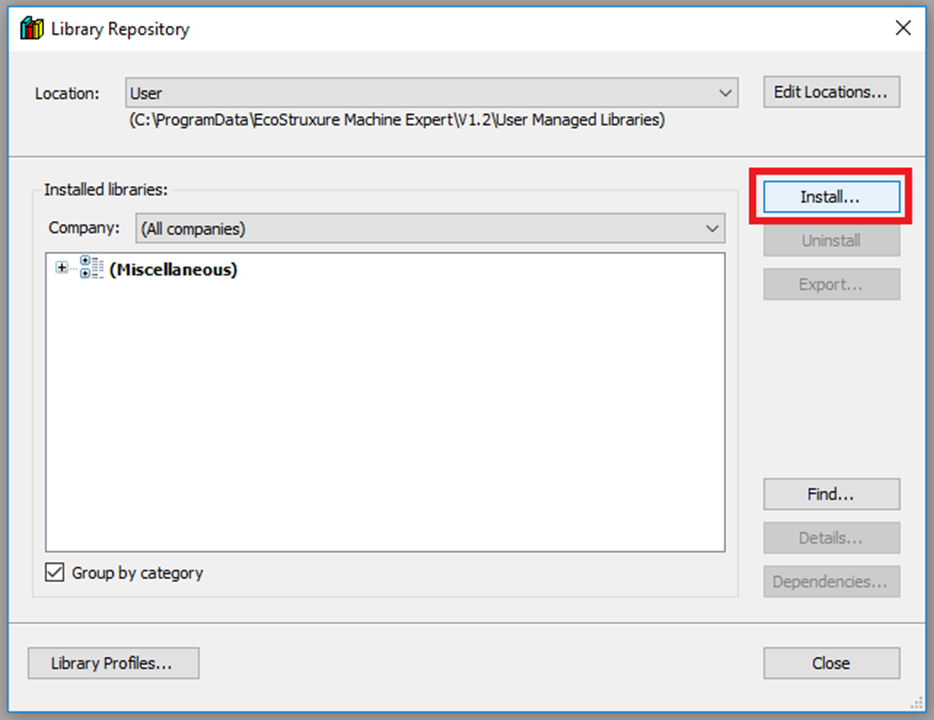
Step 2: In the Library Repository window click "Install..."
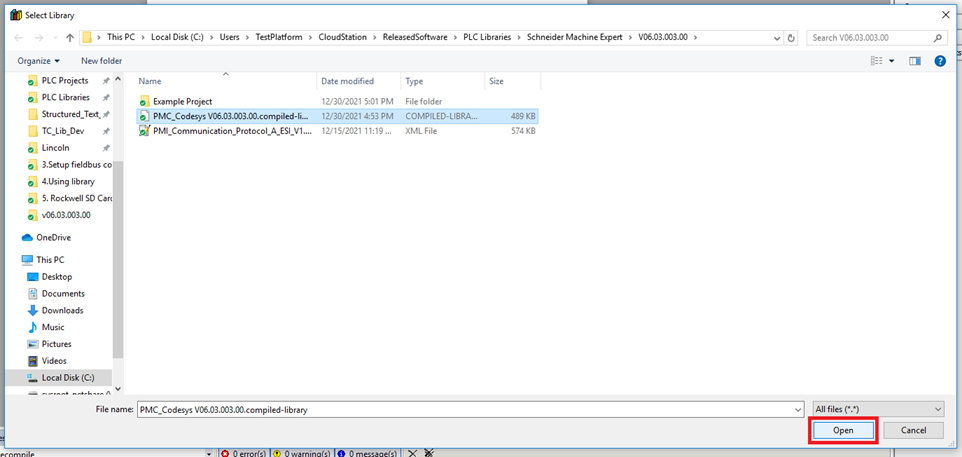
Step 3: In the Select Library window browse to and select the include PMC .compiled-library file. Then click "Open"
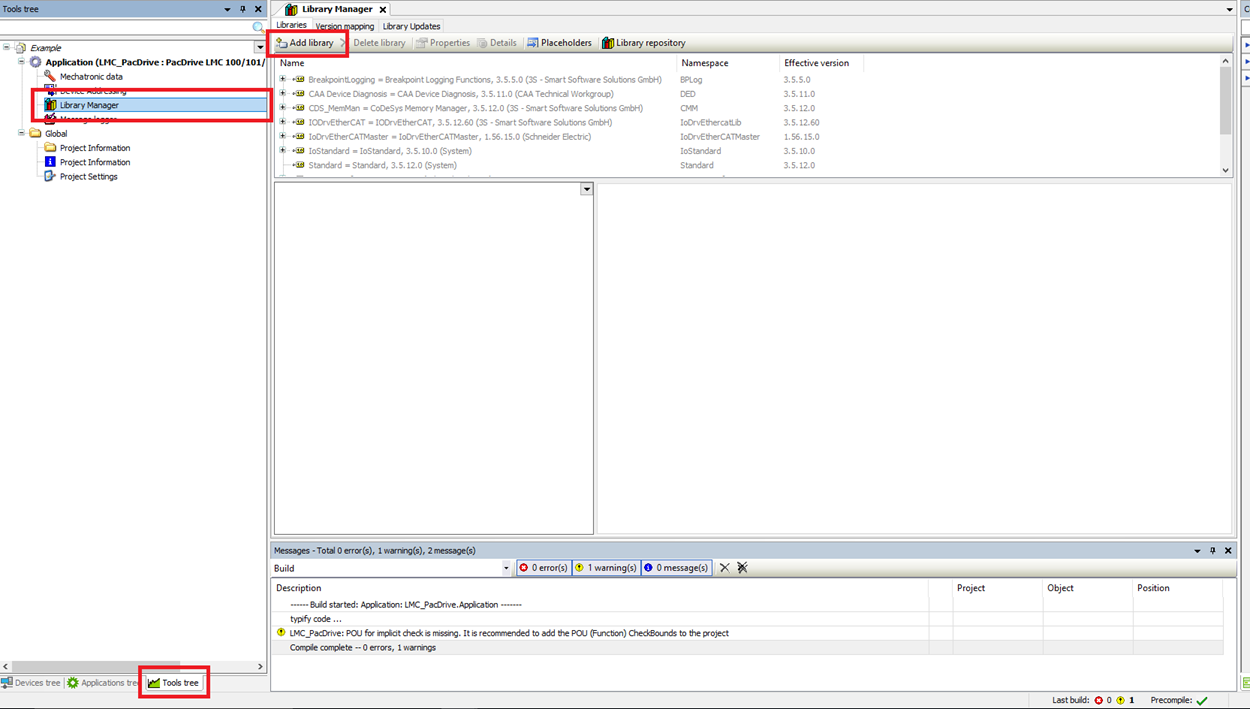
Step 4: Open the Library Manger from the Tools tree. Then click "Add library"
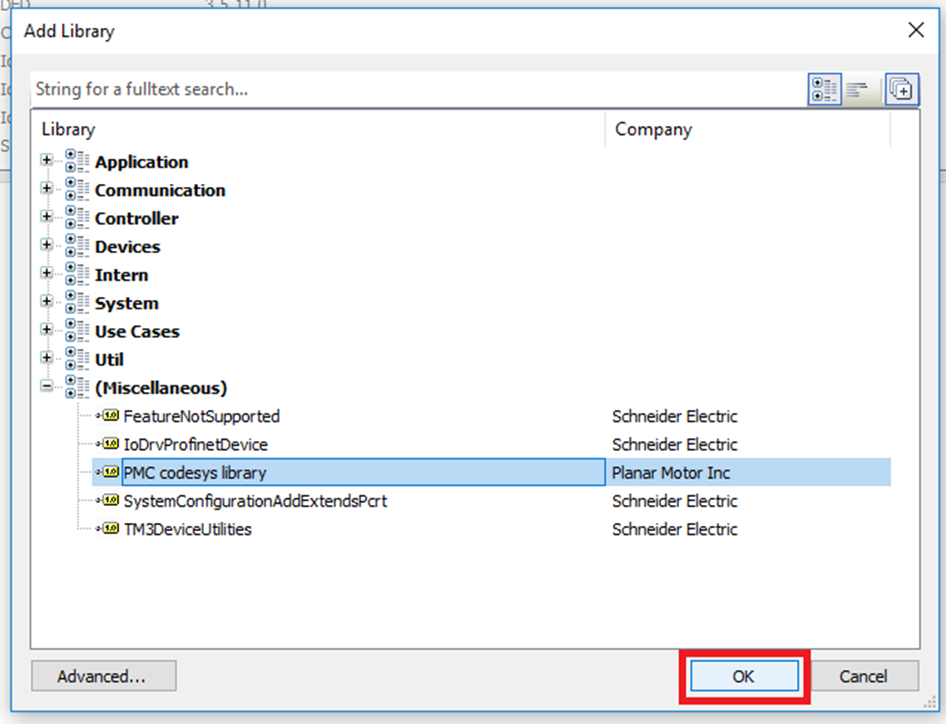
Step 5: Search for and find the PMC library and click "OK"
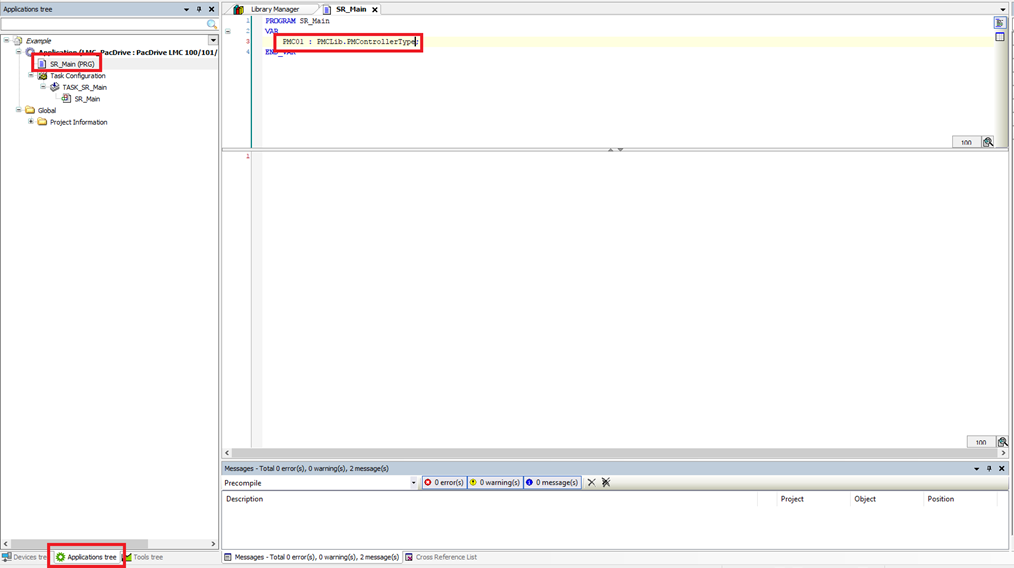
Step 6: In the Applications tree click on the Main program. Declare a PMCLib.PMControllerType variable in the Main program.
Step 7: In the Planar Motor device added in the previous section, map it's IO variables to the newly created PMCLib.PMControllerType:
Map DataToPMCArray to the DataToPMC member of the PMController variable
Map DataFromPMCArray to the DataFromPMC member of the PMController variable.

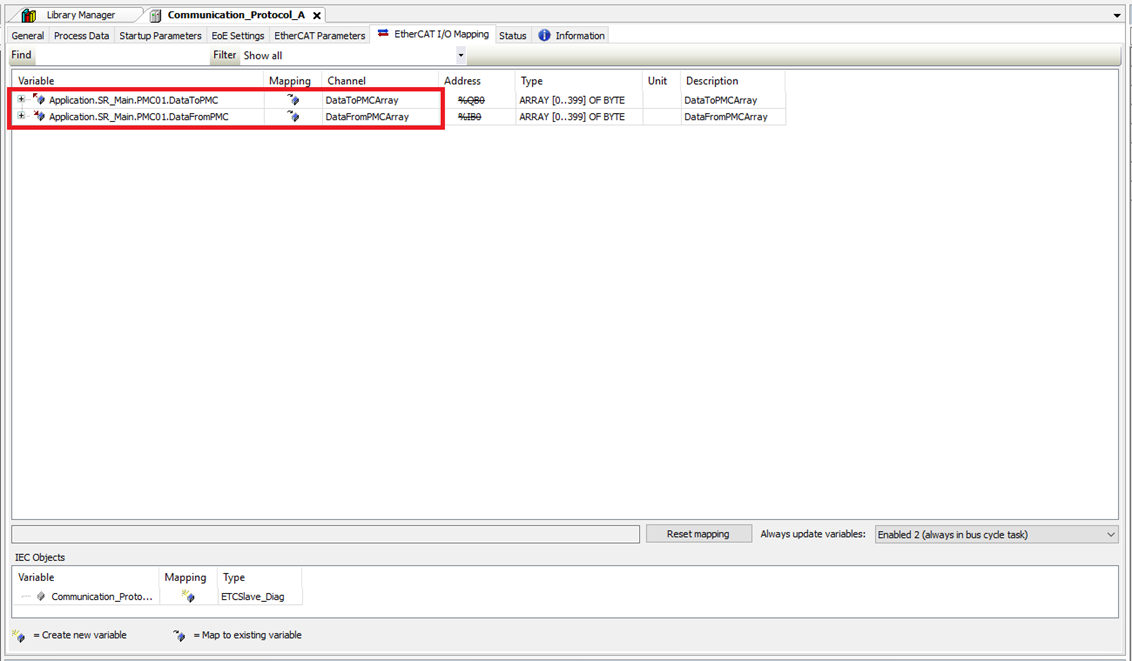
Step 8: Before using the PMC library, make sure that one and only one instance of the PMC_AutoRefresh function block is declared and that the PMC_AutoRefresh function block is called once and only once per PLC cycle

Upgrade library
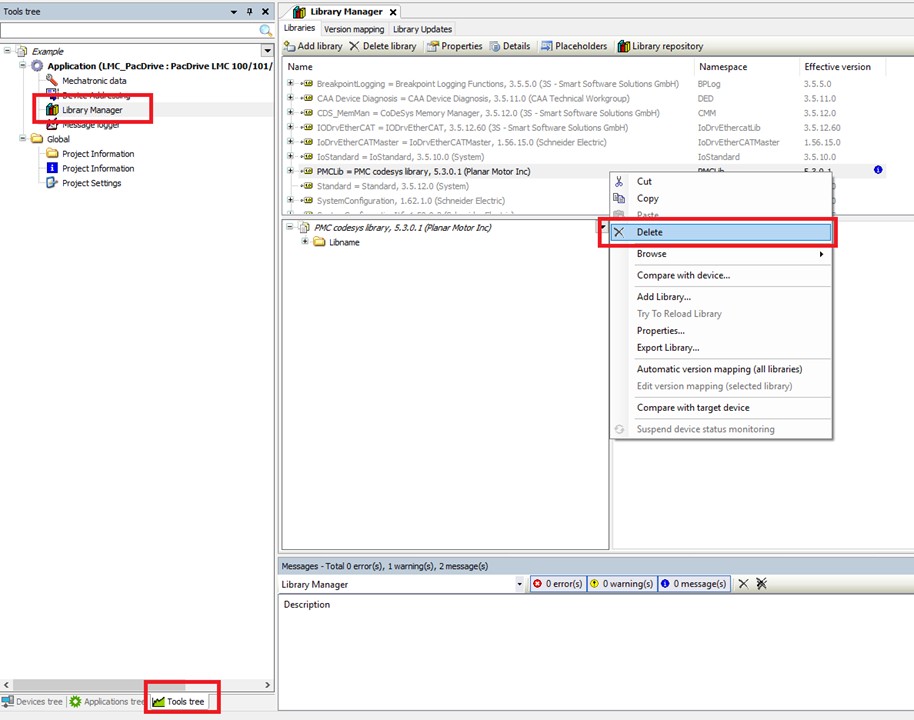
Step 1: Start by going into the Tools tree and opening the Library Manager. Then delete the previous old version of the PMC library
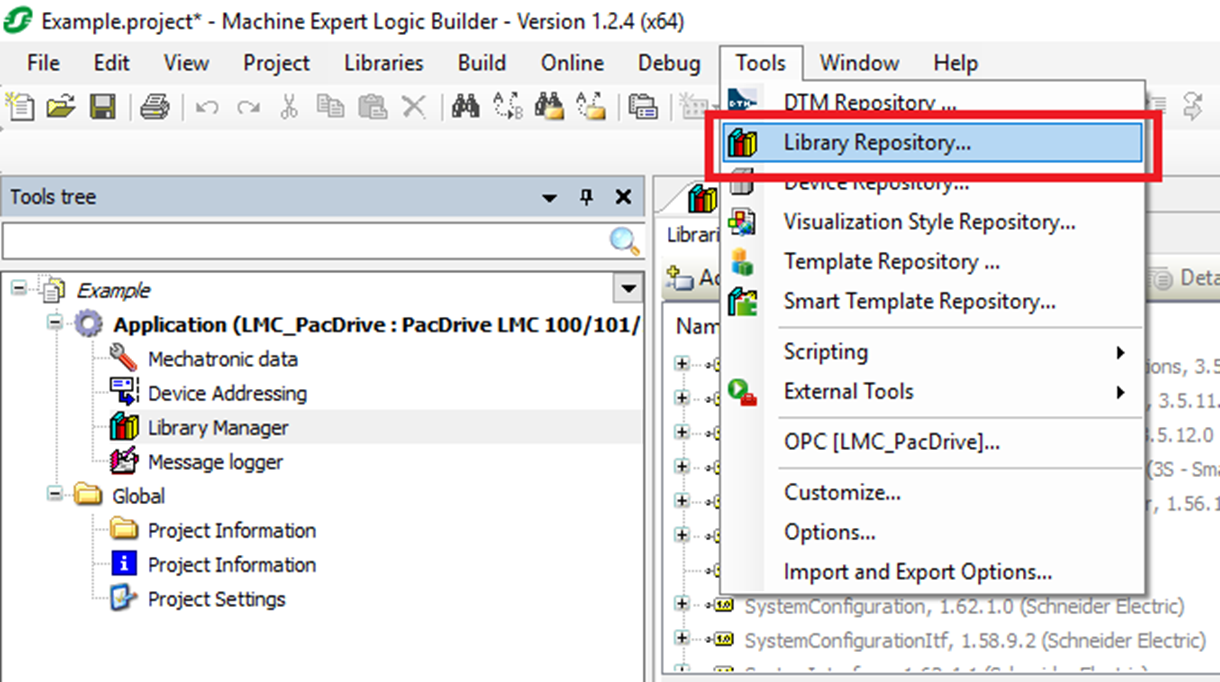
Step 2: Click Tools->Library Repository
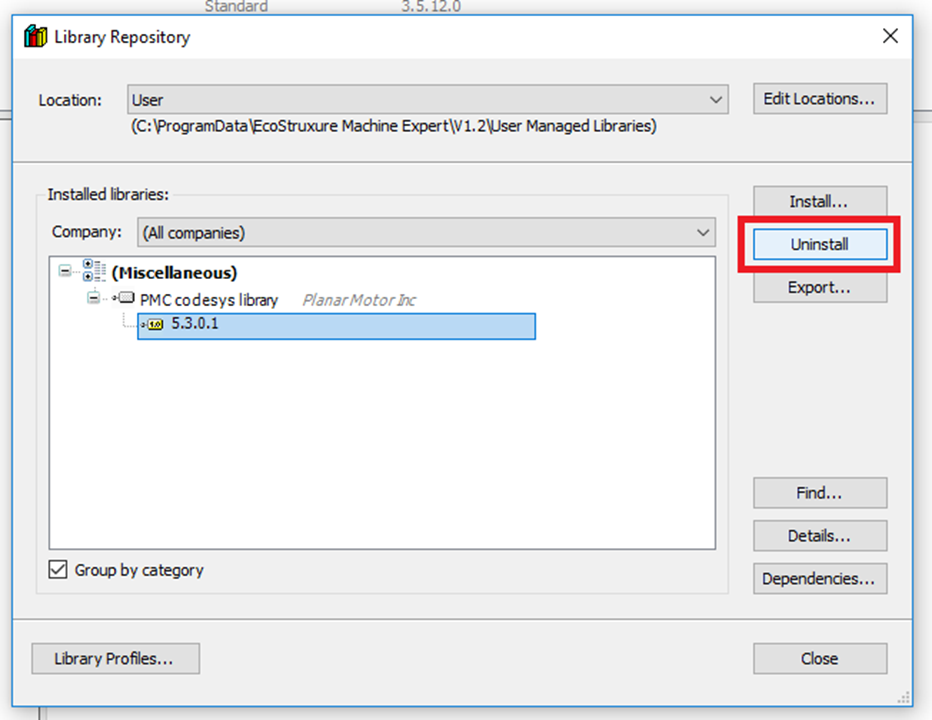
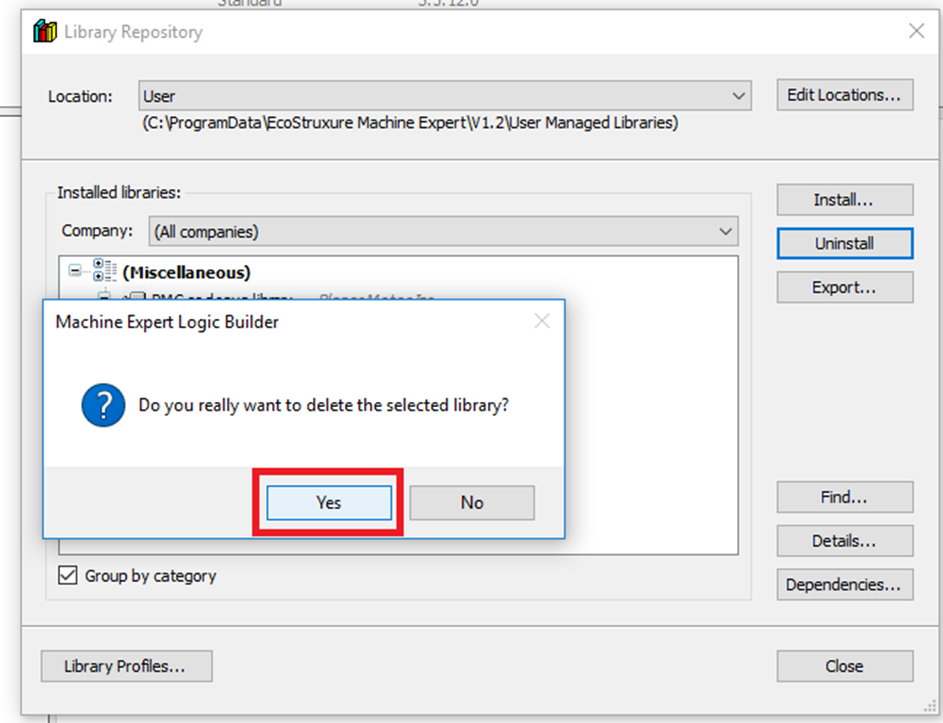
Step 3: In the Library Repository window find the old version of the PMC library and click "Uninstall"
Step 4: Click "Yes" in the confirmation box
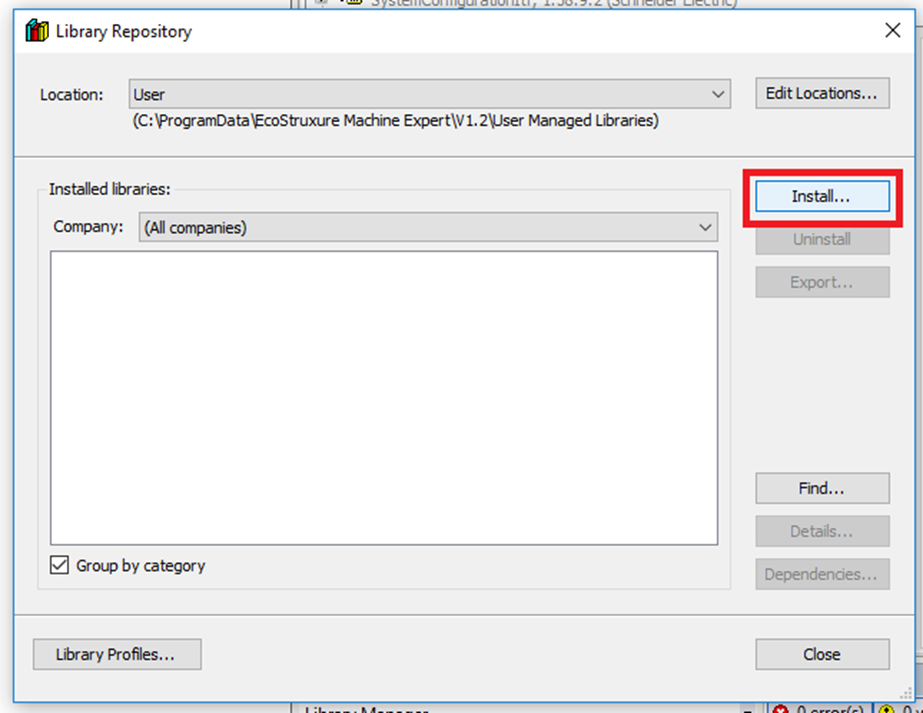
Step 5: When you are back in the Library Repository and click "Install..."
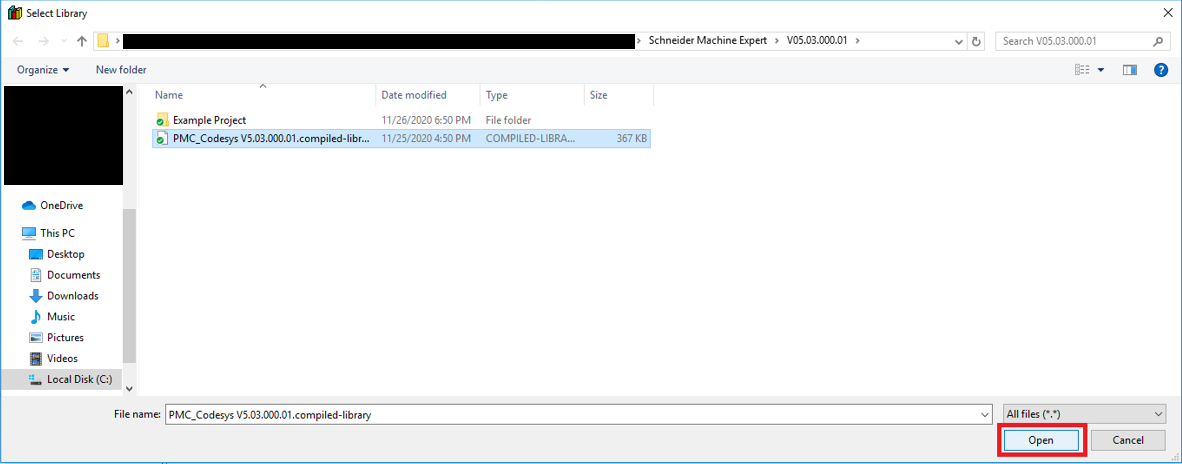
Step 6: Browse to the new version of the PMC library and click "Open"
Step 7: Then in the Library Manager click "Add library"

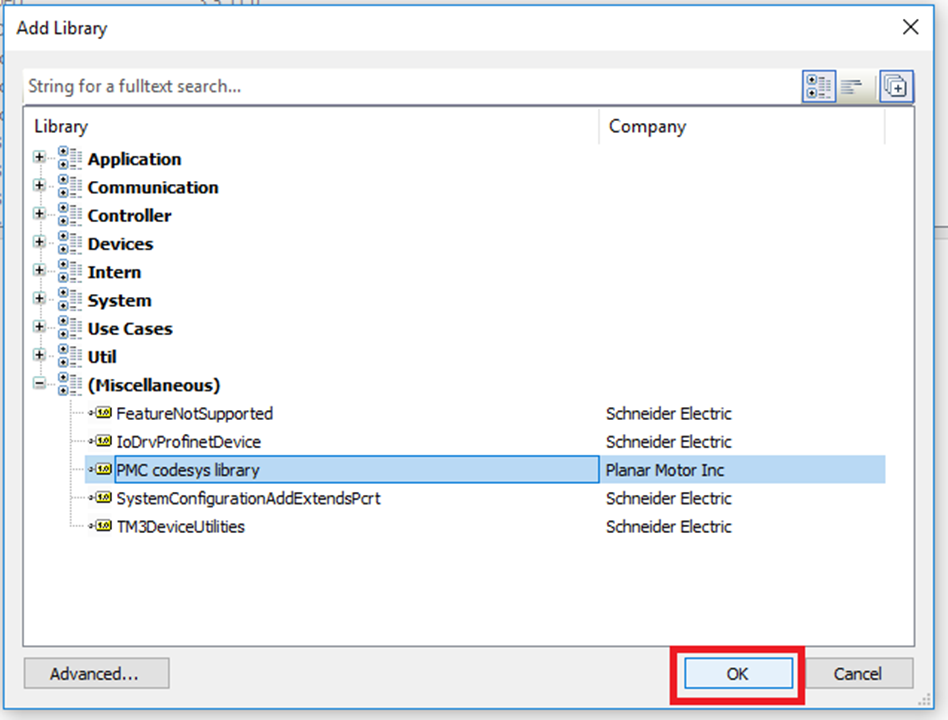
Step 8: Then in the Add Library window find and select the new PMC library and click "OK"
Setup Streaming (Optional) - only for synchronization with external axis
Step 1: In the Devices tree, click ECM_Master->Communication_Protocol_A. In the Communication_Protocol_A window, choose the General tab.

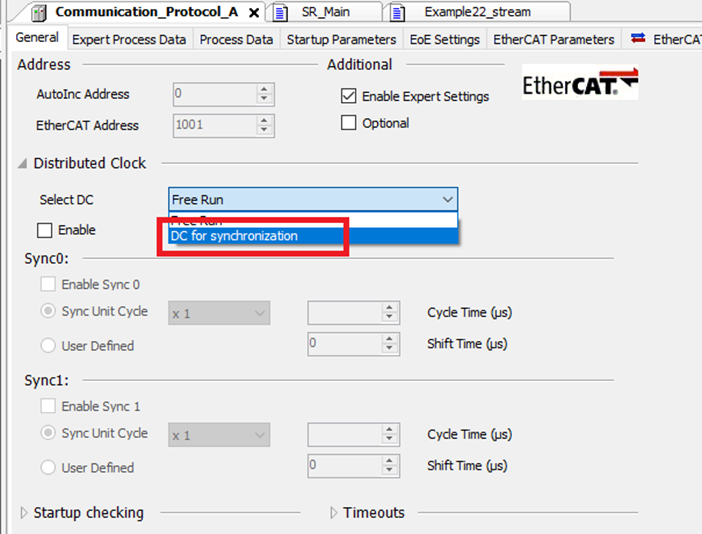
Step 2: Under Distributed Clock, choose “DC for synchronization” for the "Select DC" setting.
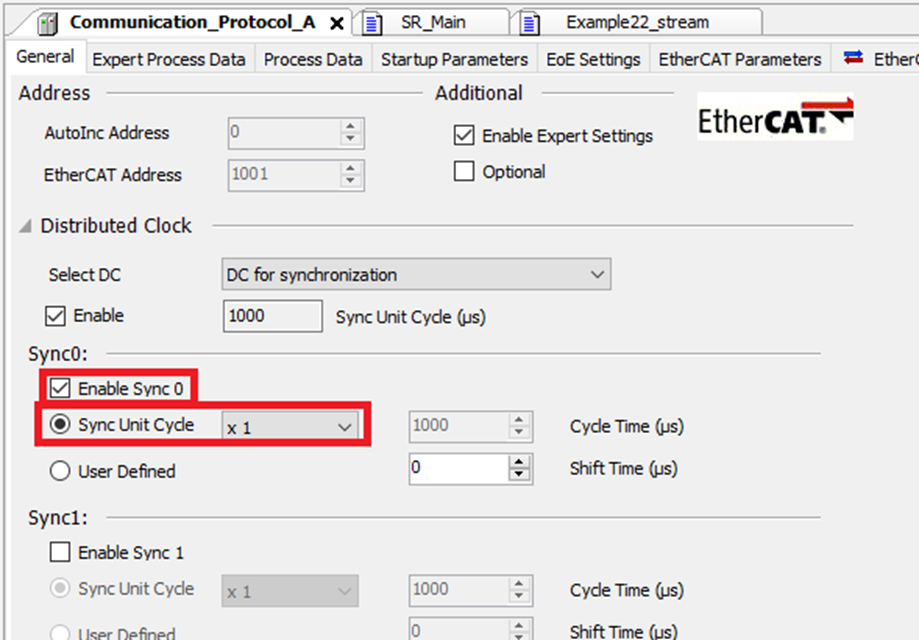
Step 3: Under Sync0 check “Enable Sync 0” and choose “x 1” for the Sync Unit Cycle
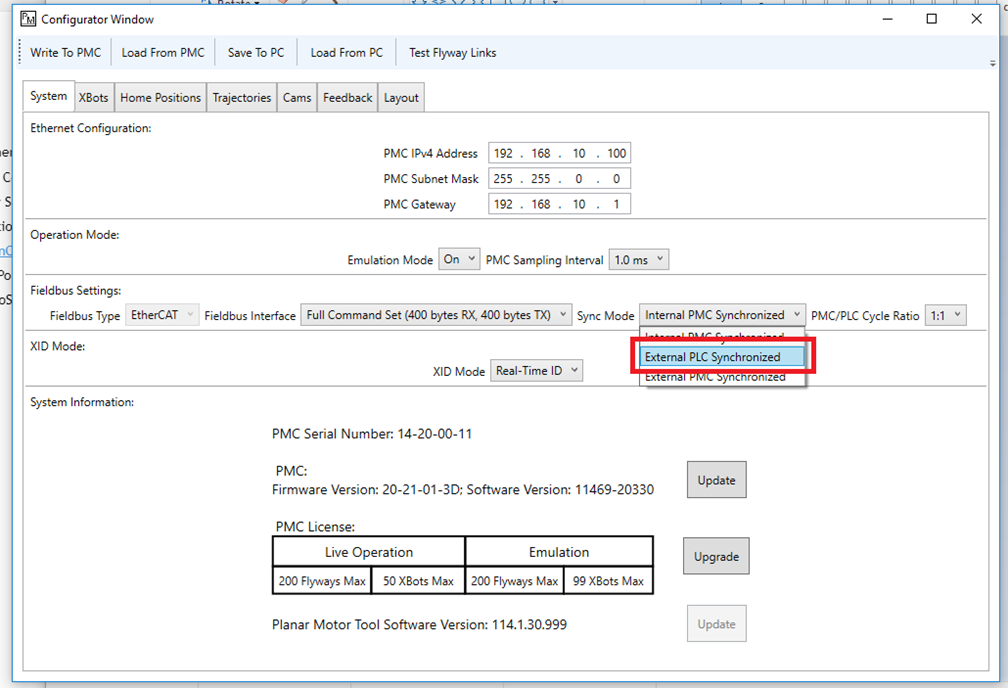
Step 4: In the Planar Motor Tool, open the Configurator, then select “External PLC Synchronized” for the Sync Mode
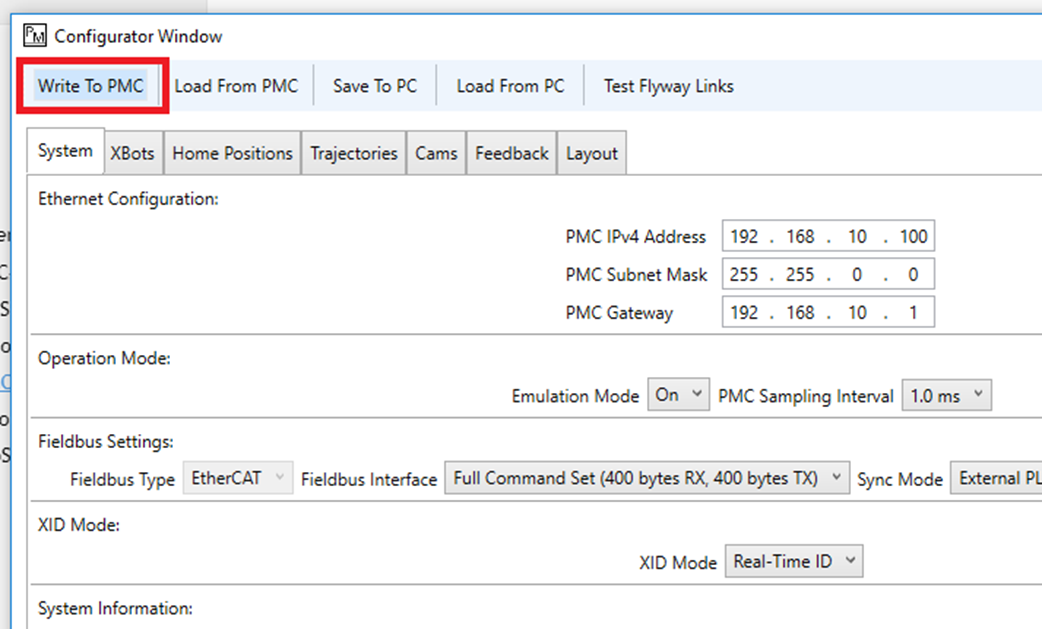
Step 5: Click "Write To PMC" to save the configuration to the PMC.
File I/O on the PLC (Optional)
The following are one possible way to read and write files to the PLC storage. It could be helpful for commands such as Set PMC Configuration.
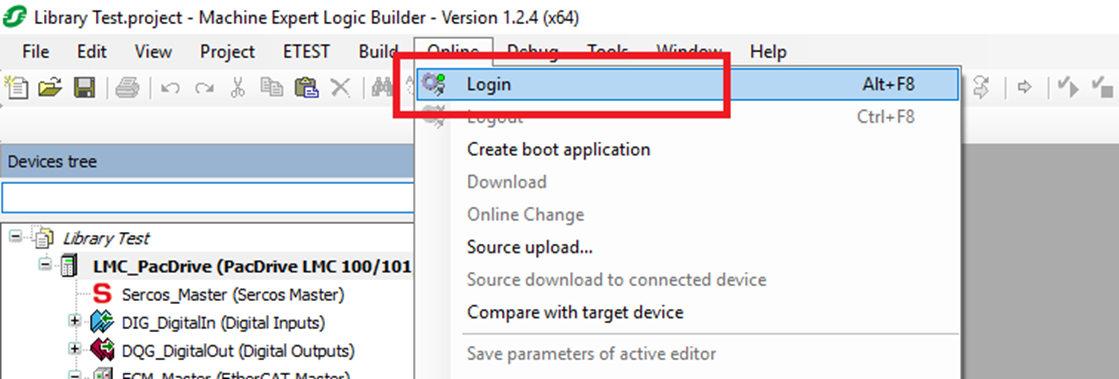
Step 1: Login to the PLC
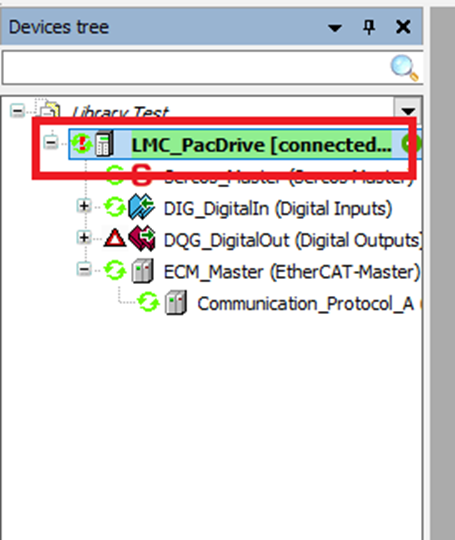
Step 2: Double click the PLC in the Devices tree
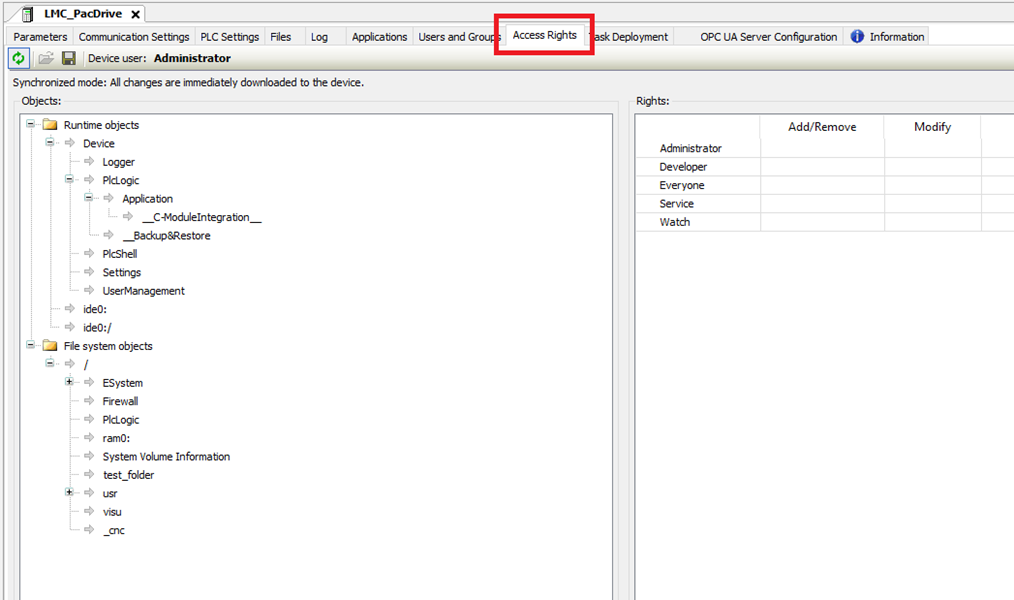
Step 3: In the PLC menu select the Access Rights tab
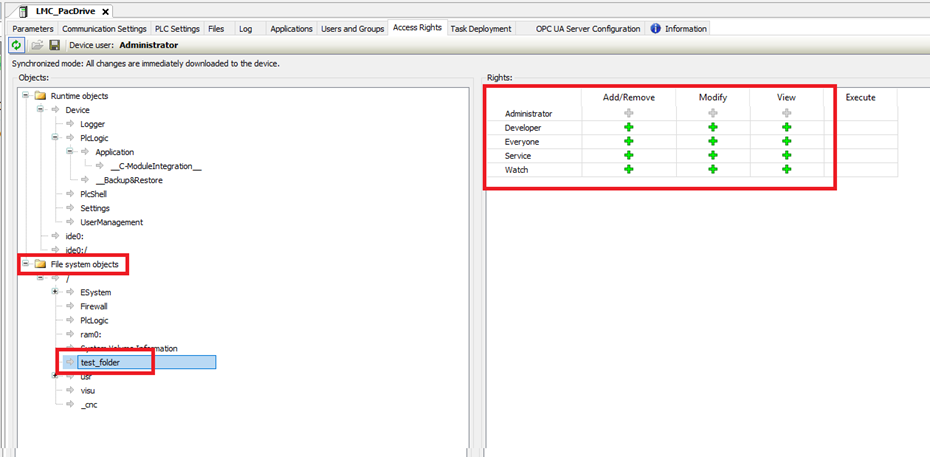
Step 4: Make sure that the user that you are logged in as has all the permissions enabled for the folders you will be using
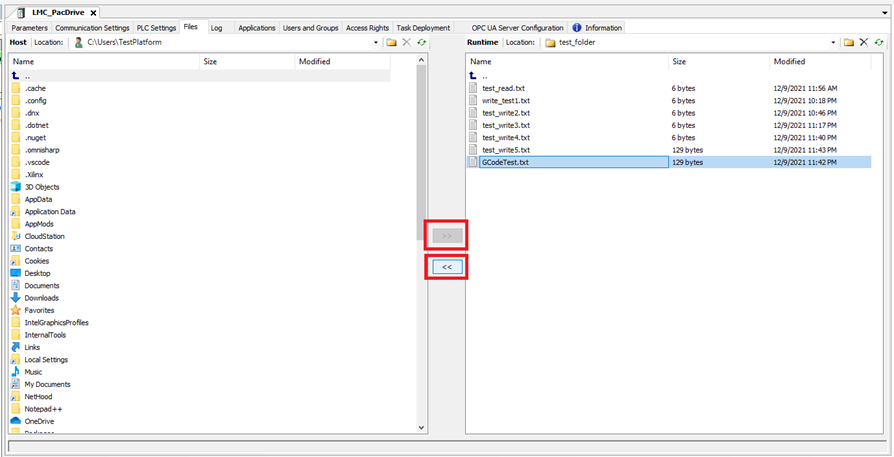
Step 5: Select the Files tab in the PLC menu
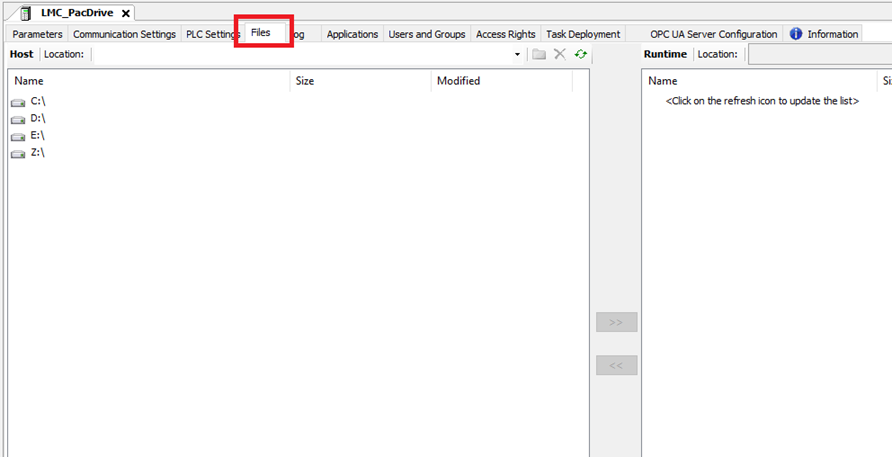
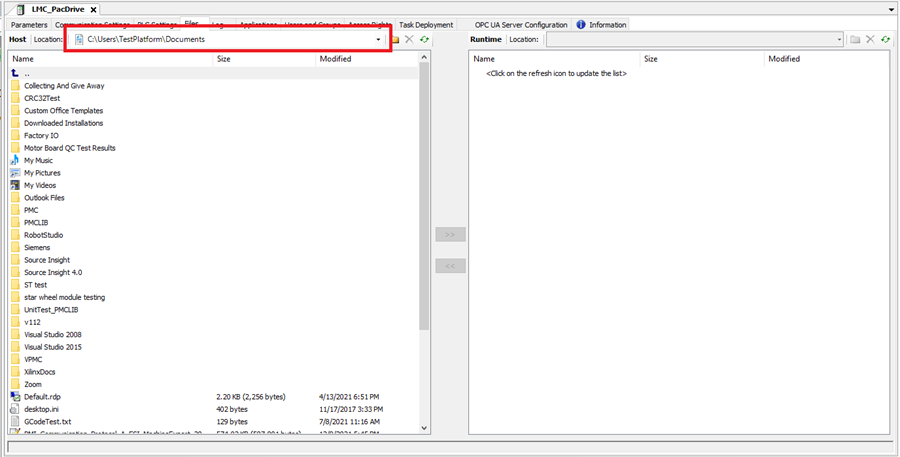
Step 6: On the Host side navigate to the folder that contains the files you want to copy to the PLC or to folder where you want to copy PLC files to. Note that Schneider Machine Expert can only access windows folders/files that do not require admin rights
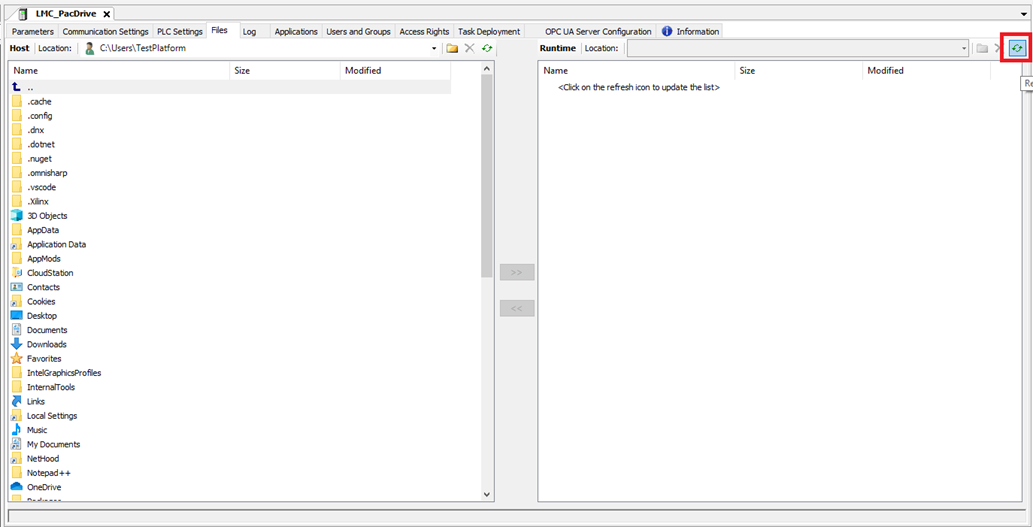
Step 7: On the Runtime side click refresh to view the folders/files on the PLC’s memory card
Step 8: On the Runtime side navigate to the folder that contains the files you want to copy to the PC or to folder where you want to copy PC files to
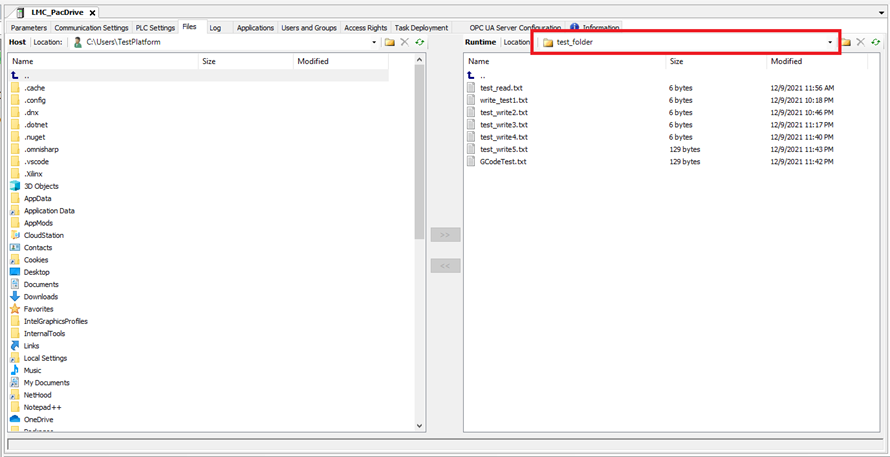
Step 9: Use the << button to copy PLC files to the PC and the >> button to copy PC files to the PMC
